A typical UPC-A barcode symbology consists of a left quiet zone, a normal guard bar pattern, 12 symbol chars divided by a center guard bar pattern, another normal guard bar pattern and a right quiet zone.
As a result, the symbol width of a UPC-A can be calculated with the formula:
UPC-A
|
W = ( C * 7 + 11 ) X + 2Q
|
W: width of UPC-A barcode image (including quiet zones)
X: width of UPC-A narrowest bar; (X min = 1 pixel)
C: the number of encoded data chars for UPC-A, including the check digit; C =12.
Q: width of the quiet zone; Q > = 7X; For Avapose, default Q=10X.
|
With the formula above, there will be three ways to set the size of a UPC-A image in C#. Here are the methods and respective examples.
Method 1. Setting the X Dimension
Setting in C# generator
Steps:
- Set the X dimension
- Set AutoResize to false
- Adjust other properties
|
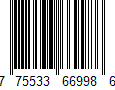
Sample:
UPCA.X=1;
UPCA.Data = "77553366998";
UPCA.AutoResize=false;
The rest of barcode settings are in default value.
Here is the generated UPC-A barcode:
|
Method 2. Setting the Barcode Width
Setting in C# generator
Steps:
- Set the barcode width
- Set AutoResize to true
- Adjust other properties
|
Sample:
UPCA.BarcodeImageWidth=150;
UPCA.AutoResize=true;
UPCA.Data ="77553322114";
UPCA.BarcodeImageHeight=95;
The rest of barcode settings are in default value.
Here is the generated UPC-A barcode:
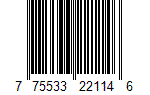
According to the formula above, the maximum X dimension is 1 pixel for this UPC-A barcode.
|
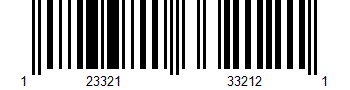
Method 3. Setting both X Dimension and Symbol Width
Setting in C# generator
Steps:
- Set the X dimension
- Set the barcode width
- Set AutoResize to false
- Adjust other properties
|
Sample:
UPCA.X=3;
UPCA.BarcodeImageWidth=350;
UPCA.Data ="12332133212";
UPCA.AutoResize=false;
The rest of barcode settings are in default value.
Here is the generated UPC-A barcode:
|
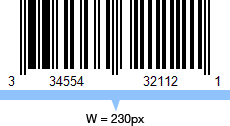
Attention:Please note that once you have set an X dimension, there will always be a minimum barcode width as calculated from the calculation above. Therefore, if the W you have set is less than the minimum value, Avapose UPC-A Generators will reset the barcode width to a minimum value according to the standard. Here is an example:
If you set in C# UPC-A generator:
UPCA.X=2;
UPCA.BarcodeImageWidth=180;
UPCA. Data ="33455432112";
UPCA.AutoResize=false;
The rest of barcode settings are in default value
|
According to the formula above,
W = ( C * 7 + 11 ) X + 2Q
//X=2pixel, Q=10X, C=12 (including checksum automatically calculated),
Wmin= (12*7+11)*2+2*10*2
=230pixel
|
However, the W (180 pixel) you have set in C# generator is less than the minimum barcode width (230pixel), so the generator will automatically reset it to 230 pixel according to standard. Here is the generated barcode image:
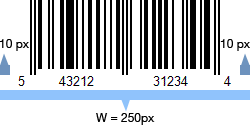
On the other hand, if you set a barcode width larger than the minimum W calculated by the formula, extra spaces will be added to either side of the quiet zones.
For instance, if you set in your C # generator:
UPCA.X=2;
UPCA.BarcodeImageWidth=250;
UPCA. Data ="54321231234";
UPCA.AutoResize=false;
|
According to the formula,
W = ( C * 7 + 11 ) X + 2Q
//X=2pixel, Qmin=10*2=20 pix, C=12 (including checksum automatically calculated),
Wmin= (12*7+11)*2+2*10*2
=230pixel
|
Now your W setting is 250 pixel, which is larger than the minimum width, so an extra 10 pixel will be added to both side of the quiet zone. Here is the barcode image:
UPC-A barcode size custom in C# for various barcode solutions