A typical Code 39 barcode symbology consists of: leading quiet zone, start character, one or more symbol characters to represent data (including optional symbol check character), stop character, and a trailing quiet zone.
As a result, the symbol width of an Code 39 can be calculated with the formula:
|
Code 39
|
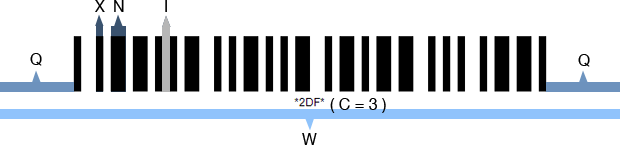
W = [ P (4N + 6 ) +N + 6 ) ] X + 2Q
|
X: width of a narrow element
C: number of encoded data chars (check digit included if used)
I: wiI: width of intercharacter gap, a multiple of X; default I=1, i.e. I=X
N: wide/narrow bar ratio (2<=N<=3)
Q: width of the quiet zone (Qmin=10X)
W: barcode width
|
With the formula above, there will be three ways to set the size of a Code 39 image in C#. Here are the methods and respective examples.
Method 1. Setting the X Dimension
Setting in C# generator
Steps:
- Set the X dimension
- Set AutoResize to false
- Adjust other properties
|
Sample:
Code39.X=2;
Code39.Data = "2012";
Code39.AutoResize=false;
The rest of barcode settings are in default value.
Here is the generated Code39 barcode:
|
Method 2. Setting the Barcode Width
Setting in C# generator
Steps:
- Set the barcode width
- Set AutoResize to true
- Adjust other properties
|
Sample:
Code39.BarcodeImageWidth=150;
Code39.AutoResize=true;
Code39.Data ="1516";
Code39.BarcodeImageHeight=75;
The rest of barcode settings are in default value.
Here is the generated Code39 barcode:
According to the formula above, the maximum X dimension is 1 pixel for this Code39 barcode.
|
Method 3. Setting both X Dimension and Symbol Width
Setting in C# generator
Steps:
- Set the X dimension
- Set the barcode width
- Set AutoResize to false
- Adjust other properties
|
Sample:
Code39.X=3;
Code39.W=230;
Code39.Data ="AVA";
Code39.AutoResize=false;
The rest of barcode settings are in default value.
Here is the generated Code 39 barcode:
|
Attention: Please note that once you have set an X dimension, there will always be a minimum barcode width as calculated from the calculation above. Therefore, if the W you have set is less than the minimum value, Avapose Code 39 Generators will reset the barcode width to a minimum value according to the standard. Here is an example:
If you set in C# Code 39 generator:
Code39.X=4;
Code39.W=250;
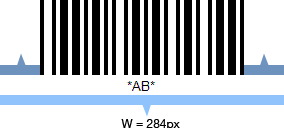
Code39; Data ="AB";
The rest of barcode settings are in default value
|
According to the formula above,
W = ( C + 2 ) ( 3N + 6 ) X + ( C + 1 ) I + 2Q
//X=4pixel, C=2, N=2(default),I=1X=4
Qmin=10*4=80 pixel
Wmin= (2+2)(3*2+6)*4+(2+1)*4+80
=284pixel |
However, the W (250 pixel) you have set in C# generator is less than the minimum barcode width (284pixel), so the generator will automatically reset it to 284 pixel according to standard. Here is the generated barcode image:
On the other hand, if you set a barcode width larger than the minimum W calculated by the formula, extra spaces will be added to either side of the quiet zones.
For instance,
if you set in your C # generator:
Code39.X=4;
Code39.W=300;
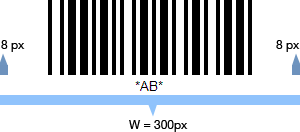
Code39; Data ="AB";
The rest of barcode settings are in default value.
|
According to the formula,
W=(C+2)(3N+6)X+(C+1)I+2Q
//X=4pixel, C=2, N=2(default),I=1X=4
Qmin=10*2=20 pix
Wmin= (2+2)(3*2+6)*4+(2+1)*4+80
= 284pixel |
Now your W setting is 300 pixel, which is larger than the minimum width, so an extra 8 pixel will be added to both side of the quiet zone. Here is the barcode image:
Code 3 of 9 barcode size adjustment in C# for various barcode solutions